

Microorganisms around us...
Introduction
Microbes, or microorganisms, microscopic, meaning they are extremely small. Despite their size, they form the basis for other living organisms everywhere. Microbiology was one of my favorite courses at Winston-Salem State University, because I really enjoyed doing the different lab experiments. Although I really have a problem with germs, this class almost made that issue worse for me. I now watch everything I touch and everything I do, even though I know that these organisms are everywhere. There is nothing you can do to change that fact. I enjoyed the class however, and I think that this is something that interests me. I will be going into dentistry and around microorganisms all the time!

Learning Outcomes
After taking a course of the Microbiology lab, the student should be able to do the following:
1. Use a bright-field light microscope
2. Properly prepare smears and slides
3. Properly perform various bacterial staining
4. Properly use aseptic techniques
5. Prepare and use microbiological media and biochemical test media
6. Estimate the number of microorganisms
7. Identify bacteria based upon morphology, staining, and biomedical tests

1. Using a bright-field microscope
The major key to knowing how to use the microscope is knowing and understanding all the parts associated with the microscope. Another important key to the microscope, after understanding the parts, is having the ability to find a specimen and viewing it by eye with the microscope. This can be a simple process but it gets a little bit trickier when you are the person creating the slides.

2. Properly prepare smears and slides
Before you can view a bacterial slide under a light microscope, you must do a bacterial smear. First, use the wax pencil to draw a circle on the microscope slide, to separate different types of bacteria. This step is only used for slides with multiple bacteria. If the slide that is being made only contains one type of microorganism, this step can be skipped. You must have all materials that will be used sterilized. The first step is this heating the loop. After heating, the loop is placed in water to retrieve a small drop, added to the slide. The more water added to the slide, the longer it will take the slide to dry. The loop is then sterilized once more. This has to be heated until the metal turns an orange color. After letting the loop cool down, place the loop in preferred bacteria and place the bacteria in the water drop on the slide, mixing them well, with the loop. Let the bacterial slide dry.


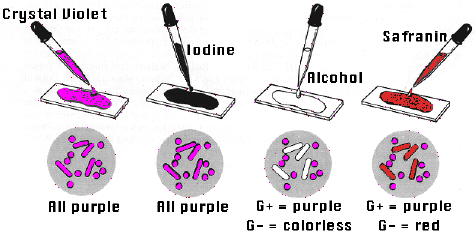
3. Properly perform various bacterial staining
Gram staining is a very popular staining procedure in microbiology. This is the first test that is used to classify different microorganisms as either gram negative or gram positive bacterium. There are various steps to a gram stain. Creating a bacterial smear is the first. Once this step is complete, the slide must be heat fixed and then the staining process can begin. The first stain is crystal violet. This stain must sit on the slide for about 30 seconds. The slide has to then be rinsed with distilled water for about 5 seconds. The next stain is the iodine, which has to remain on the slide for one minute. Another rinse of the distilled water is required for 5 seconds. A decolorizer or form of alcohol is used next and the slide must be rinsed with it between 15 and 30 seconds. Another rinse of distilled water for 5 seconds is next. The last stain is the safranin and remains on the slide between 60 and 80 seconds. The slide is rinsed one more time with distilled water for 5 seconds. Bibulous paper is then used to dry the slide. After the slide has been dried, it will be ready for use under the microscope.


4. Properly use aseptic techniques
It is extremely important in any lab to understand the potential hazards that the scientist could be faced with. It is also important that there are no possible contaminations with the environment and studied microorganisms. Aseptic techniques make sure of that. It is essential to make sure that old bacteria or used microorganisms are disposed appropriately.


5. Prepare and use microbiological media and biochemical test media.
-
Measure the components of the medium (e.g. TSA or nutrient, see Appendix) into a flask containing 9/10 volume of the solvent. Use a clean chemical spoon for every measurement. Dissolve the solid components and fill with the remaining solvent up to final volume. If the medium contains heat sensitive components (like sugars), they must be separately sterilised in solution (e.g. by filter sterilisation), and then mixed with the already sterilised and cooled agar medium.
-
Close the flask with cotton plug and cover with aluminium foil, put into the autoclave and start a sterilisation cycle (see EXERCISE 1). This cycle could be intermitted when the internal temperature has reached 121°C, at that temperature every component (e.g. agar-agar) will be dissolved correctly.
-
Check the pH of the medium with an indicator paper or with a pH meter and adjust to the proper value with NaOH or HCl solution.
-
Pour the 60-70°C medium into the dispenser. Add 5-6 mL medium to each test tube, close them with caps and place them into a test tube basket.
-
Place the tubes into the autoclave and complete a whole sterilisation cycle for 20 min at 121°C
-
Put the test tubes onto a slanting stage to let the medium solidify in the test tubes.
-
Label the slants according to the type of the medium and perform a sterility test: incubate the test tubes at 28°C for 24 hours, and check for sterility.
-
The prepared media can be stored for 1-2 weeks at 12-15°C, or longer in a refrigerator.
After creating and storing media, one must remember the sterilizing methods used in the lab. After having sterile tools, you can use the different biochemical tests. These tests can be used in determining different microorganisms, and their standards could help to rule out other microorganisms.


6. Estimate number of microorganisms
Scientists use serial dilutions (a series of 1:10 dilutions) to calculate the population density of bacterial cultures. When a drop of culture containing a small number of bacteria is plated and incubated, each cell theoretically will be far enough away from other cells that it will form its own colony. (In reality, some colonies may be descendants of two nearby cells, but this is rare in dilute cultures, and so the number of colonies is a very good estimate of the number of cells originally transferred to the plate.) Because the population density is unknown, a variety of dilutions must be used in order to end up with one plate with an appropriate number of colonies.

7. Identify bacteria based upon morphology, staining, and biochemical tests.
The most fundamental technique for classifying bacteria is the gram stain. It is called a differential stain because it differentiates among bacteria and can be used to distinguish among them, based on differences in their cell wall. There are several methods to identify the different types of bacteria.
They include: isolation in pure form, staining reaction, morphology of bacterial colony, cultural characteristics, metabolism, and biochemical properties.
1. Isolation in pure form
Studies on the biochemical, antigenic and other characters of bacteria can be done only if the organism available in the pure form.
Technique: Plating on solid culture media‐clinical sample is streaked onto a solid medium (like: MacConkey agar, nutrient agar or blood agar) in such a way so as to ensure isolated discrete colonies. Use of selective growth condition‐most important example of this is the growth of anaerobic bacteria which will not take place in an environment having oxygen.
2.Staining reaction
The age of the culture is important. In older cultures , staining characteristics either vary or are not brought out well. Simple stains bring out the best morphology. Differential and special stains are necessary to bring out characteristics like: gram negative and gram positive bacteria, Acid fast and non acid fast , spirochetes, capsule and flagella
3. Morphology of the bacterial colony
a. Shape: circular, irregular, radiate or rhizoid.
b. Size: diameter in millimeters
c. Elevation: flat, raised, low convex, dome shaped
d. Margin: Entire, wavy, lobate, filiform
e. Surface: smooth, wavy, rough, granular, etc.
4. Cultural characteristics
These provide additional information for the identification of a bacterium.
5.Metabolism
To classify the differentiate species following aspects are studied
a. Requirement of oxygen
b. The need of co2
c. Capacity to form pigments
d. Power of hemolysis
6. Common Biochemical Tests
Some of these tests include: Indole, Methyl Red/Voges Proskauer, Citrate, H2S production in SIM, Motility, Lactose fermentation, Sucrose fermentation, Glucose fermentation & gas production, and Triple Sugar Iron Agar (TSI) test
Common tests for enzymes include: Catalase test, Oxidase test, Urease test, Coagulase test, and Nitrate reduction
References:
All videos come from YouTube
All images come from Google
All information comes from Microbiology course